

Have you ever needed to create a simple REST API with a few endpoints? Did you ever need to run some code at some specified time? It's often impractical and slow to create an entire backend / linux machine for these types of taks. That's where Azure Functions comes in, cutting that process down to a few clicks.
What are Azure Functions?
Azure functions is one of the many cloud services on Azure. This service was created to run code without the need to deal with setup or any other server configuration at all. This allows you to focus jump into writing code right away. This type of service is called serverless. It's as simple as, picking a runtime, a version of that runtime, an operating system, setting up dev environment and you can jump into coding. Be it WEP API, IOT request handling, CRON taks, or many more.
What is serverless?
Serverless is a cloud computing model in the Platform as a Service (PaaS) domain, that enables you to build and run applications without having to manage the underlying infrastructure. Your and many more applications run on shared servers owned and managed by a cloud provider, and you typically don't have direct access to these servers (hence PaaS). Providers usually cluster applications with same runtime environment, version, and operating system on same servers. When your application is not in use, it is inactive, or in a state we call sleep. When a function is triggered, the runtime environment for your application is spun up, resulting in cold-starts, your code is executed, and then your trigger goes back to sleep after a period of inactivity (usually around 5 minutes). The provider charges you only for the time that your application is active, rather than for an entire month, so you only pay for the actual time your code is running. Serverless solutions are know for generous free tiers.
Pros and cons of serverless
As you probably learned in the previous paragraph, the probably the biggest advantages are:
- Serverless triggers are much cheaper than dedicated servers
- Very generous free tiers
- Automatic scalability in times of high demand for your site
However, there are also disadvantages:
- You cannot predict cost of the hosting beforehand as it depends on demand which varies monthly. (Although you can set limits)
- Adding any kind of middleware is nearly impossible, it can be done, but it's relatively hard
- Your app goes into inactive state every few minutes (usually 5), which means that the next person to request it will encounter a cold-start in the range of 1 - 20 seconds.
With each technology, it's important to keep in mind all of these factors, before locking yourself into using it.
When would I (personaly) use Azure functions?
Personally, I would use Azure Functions for simple endpoints (APIs) and repeating scripts (CRON), if I didn't have Linux machine available, for the following reasons:
- Free 1 000 000 requests per month (yeap, that's all :D)
I will probably never use Azure functions in production for products I care about. It's because everything they provide can be easily set up on my Linux server, where I feel more comfortable making changes, keeping things functional, and maintaining code for longer periods of time. I had some Azure Functions running for a while, but decided to transfer them to VPS, mostly because of the cold start, but if you want something small (project size), cheap, and fast to publish, I think you could find Azure Functions usefull.
Steps to setup
- Open your Azure portal.
- Under the "Azure services" heading, click on "Create a resource".
- In the marketplace, find "Function App" and click on "Create".
- After that, you should be in the following menu:

Azure Functions creation page in the basics tab | Azure functions creation page - The most important setting here, is Plan type. This setting has affect on the following:
- Other settings will depend on what you need, however one thing I would suggest is: using Linux as an operating system
- After you selectd what you want, click on "Create" button and you're done. The rest of the options in the top row are just add-ons for more complex functions that interact with other Azure resources. We won't get into that here.
Setting up development environment
As you can notice in the picture above, we have selected Linux as the operating system. Since most backends run on Linux, we will also use Linux in this article. The problem with this is that if you are using Linux, you cannot edit the code online. That's why in the next section I'll show you how to setup the local development environment, which tools you need, and how to publish the function / trigger to Azure afterwards. What we'll do is basically mimick Azure Functions locally. When it comes to it, this approach should be always preferred instead of using Azure's code editor and testing in production.
Prerequisites:
- Have NodeJs installed (v. 16.5.0 in my case, but every version
^14.0.0should be ok)
Once you have NodeJs installed, the first thing you need to do is open the command prompt and type in the following command:
npm install -g azure-functions-core-tools@3 --unsafe-perm trueThis installs the func CLI and adds it to your path. You need this CLI to mimic azure functions
localy. To verify that the command has been added, type func -help, if you get an output with CLI
arguments help, you have followed the steps correctly, if not, check your node installation using node -v
or npm -v and try again.
If you're still stuck, you can download Azure tools plugin into Visual Studio Code. You can then press
CTRL + SHIFT + P (opens command palette) and execute the same commands using func
inside VSCode instead of terminal. However, I recommend this as a last option, because the plugin has a few issues at the moment and the
func CLI it uses (v2) is deprecated.
First project - Simple HTTP API endpoint
Prerequisites:
- Created Azure Functions resource
- Ready to use development environment
Project creation
Once we have the environment set up, we can start creating a new project. Since this is a first project, we're going to go step by step through the creation process. As a first step, cd into the location, where you want to create this new project. Then run the following command:
func initOnce you ran this command, a list of options will appear, use the arrow keys to decide what type of project you want to create. In our case, we'll hover over to "node" and press ENTER. Next we get to decide the language to use. In our case, we'll select Javascript. Once we make the choice, we should get the following project structure:
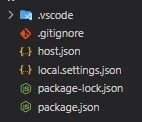
Nice! Now, we have a new project ready, all we need to do, now is add various endpoints or event handlers to it. We can do this with the following command:
func newThis command may take some time, but when it loads, you should see a table of different triggers. Using arrows, once again, hover over to the
HTTP trigger and select it using ENTER. Next, you'll be asked for a trigger / function name. This name will be the name of the folder and trigger
generated. In our case, we'll leave it as a default HttpTrigger. Your folder structure should look like
this:
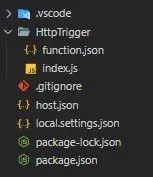
In the newly generated folder, there are 2 files (index.js and functions.json). However, right now, we're only interested in the index.js, because it's the place we'll be writing our code. That being said, functions.json is also an important file as it contains the trigger settings - if you're interested in learning more about these settings, Microsoft has good-enough documentation about it.
Inside your HttpTriger/index.js, you should have basic pre-generated "Hello World" code that looks like this:
module.exports = async function (context, req) {
  context.log("JavaScript HTTP trigger function processed a request.");

  const name = req.query.name || (req.body && req.body.name);
  const responseMessage = name ? "Hello, " + name + ". This HTTP triggered function executed successfully." : "This HTTP triggered function executed successfully. Pass a name in the query string or in the request body for a personalized response.";

  context.res = {
    // status: 200, /* Defaults to 200 */
    body: responseMessage,
  };
};
Running and debugging the project
If you're following along, now comes the most important part, we can finally start our project. You can do this by running the following command:
func startThis command will start the project locally. After starting, the program reports which endpoints are available and continually prints out a log
of what it is doing. If you'd like more detailed logging than what is currently being printed, append a --verbose flag to the previous command. If you're using VSCode, you can also enter this command via the command
palette, or just click F5.
Publishing to Azure
Once we have tested our project locally, we can easily publish it by running the following command:
func azure functionapp publish {name of the azure resource}Chances are, that this command threw you an error. Most likely the error looked like this:
Unable to connect to Azure. Make sure you have the `az` CLI or `Az.Accounts` PowerShell module installed and logged in and try againIn order to publish to Azure Functions, we need to install Azure CLI. You can easily download this CLI from Microsoft documentation. Once you've installed the Azure CLI, all you have to do is restart your
terminal (or refresh path), run az login and pick up where we left off (Re-enter the command above).
Voiala, this is the end of the first project. We have created a HTTP trigger, we tested it locally and the pusblished it to Azure Functions. Don't worry, the next two are more interesting :D!
Second project - More complex HTTP API endpoint
You might be wondering, "What am I going to build in this project?" We will be developing a simple Azure Functions HTTP Trigger endpoint that converts an image into ASCII art.
Technical specification: User sends a Base64 text to our endpoint, and it returns the ASCII art in response.
For those unfamiliar with ASCII art, here's an example produced by the code we're going to create:

Prerequisites:
- Ready to use development environment
Furthermore, to spice things up, we will develop this project in Python. What does that mean for you? Well, just that you have to select on
Azure that you want the project to be written in Python, and you also have to select Python after the func
init command. But nothing else changes. That's the beauty of Azure Functions, once you have it set up, it can be written in most popular
languages without any problems. Lastly, you then add a new HTTP Trigger via func new. We'll use this
trigger to convert images to ASCII art.
After completing the steps above, your project structure should look like this:
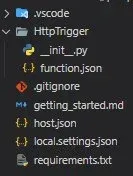
Notice how the structure of this project differs from the Node.js project. If you're interested in what each file in the project does, you can
go ahead and read getting_started.md. But for us, the main files will be requirements.txt and __init__.py. The requirements.txt file lists all the packages we'll be using. We then write the program itself into __init__.py, which should currently have following pre-generated code:
import logging
import azure.functions as func

def main(req: func.HttpRequest) -> func.HttpResponse:
    logging.info('Python HTTP trigger function processed a request.')

    name = req.params.get('name')
    if not name:
        try:
            req_body = req.get_json()
        except ValueError:
            pass
        else:
            name = req_body.get('name')

    if name:
        return func.HttpResponse(f"Hello, {name}. This HTTP triggered function executed successfully.")
    else:
        return func.HttpResponse(
             "This HTTP triggered function executed successfully. Pass a name in the query string or in the request body for a personalized response.",
             status_code=200
        )
Creating the main functionality
As a first step, we need to clean up the __init__.py file a bit to remove the "Hello World" bloat
:D.
import logging
import azure.functions as func

def main(req: func.HttpRequest) -> func.HttpResponse:
    logging.info('Python HTTP endpoint triggered.')

    return func.HttpResponse(
        "This HTTP triggered function executed successfully.",
        status_code=200
    )
Already looks better! Now we have a clean application that only returns HTTP code 200 and a message. We can assume that our application will
receive a lot of data per request, so it's a good idea to outright deny requests other than POST. We do this by going to functions.json and changing the methods field to ["post"] only.
Now that we have everything set up we just need to program the conversion of base64 images into ASCII art.
Logically, the first thing we need is to code in, is retrieving the picture from the request body:
image_obj = {}
try:
    req_body = req.get_json()
except ValueError:
    pass
else:
    image_obj = req_body.get('image_obj')

if not image_obj:
    return func.HttpResponse(
        "Please send base64 'image_obj' argument",
        status_code=422
    )
Next, we'll need to add some image-processing libraries. That's the purpose of the requirements.txt
file. Our project will need the following libraries: PIL, io,
base64. All you have to do to "install" libraries is write them into the requirements.txt. Your file should then look like this:
# Do not include azure-functions-worker as it may conflict with the Azure Functions platform
azure-functions #Should be there by default
PIL
io
base64
After adding the packages, we can use them in our project by importing them at the top of the __init__.py file.
import logging
import azure.functions as func

from PIL import Image
from io import BytesIO
import base64
After a long setup, we can finally start processing the image itself. First we need to convert the image from base64 to Image type. Next we adjust the resolution of the image, because we don't want our ASCII art to be huge. The last thing we'll do is convert our image to black and white.
img = Image.open(BytesIO(base64.b64decode(image_obj)))

new_width = 180
width, height = img.size
aspect_ratio = height/width
new_height = aspect_ratio * new_width * 0.55
img = img.resize((new_width, int(new_height)))

# Convert image to black and white
img = img.convert('L')
Once we've processed the image, we need to go pixel by pixel, take the value, and assign it to a predefined character, put the ASCII art together and set it back in HTTP response. That's what this piece of code does:
chars = ["@", "#", "$", "%", "?", "*", "+", ";", ":", ",", "."]

pixels = img.getdata()

new_pixels = [chars[pixel//25] for pixel in pixels]
new_pixels = ''.join(new_pixels)

new_pixels_count = len(new_pixels)
ascii_image = [new_pixels[index:index + new_width] for index in range(0, new_pixels_count, new_width)]
ascii_image = "\n".join(ascii_image)

logging.info(ascii_image)

return func.HttpResponse(
    ascii_image,
    status_code=200
)
Finished version of the trigger code should look like this:
import logging
import azure.functions as func

from PIL import Image
from io import BytesIO
import base64

# Set constants
new_width = 180
chars = ["@", "#", "$", "%", "?", "*", "+", ";", ":", ",", "."]

def main(req: func.HttpRequest) -> func.HttpResponse:
    # Log that endpoint has been triggered
    logging.info('Python HTTP endpoint triggered.')

    # Try get image from req body
    image_obj = {}
    try:
        req_body = req.get_json()
    except ValueError:
        pass
    else:
        image_obj = req_body.get('image_obj')

    if not image_obj:
        return func.HttpResponse(
            "Please send base64 'image_obj' argument",
            status_code=422
        )

    img = Image.open(BytesIO(base64.b64decode(image_obj)))

    width, height = img.size
    aspect_ratio = height/width
    new_height = aspect_ratio * new_width * 0.55
    img = img.resize((new_width, int(new_height)))

    # Convert image to black and white
    img = img.convert('L')

    pixels = img.getdata()

    new_pixels = [chars[pixel//25] for pixel in pixels]
    new_pixels = ''.join(new_pixels)

    new_pixels_count = len(new_pixels)
    ascii_image = [new_pixels[index:index + new_width] for index in range(0, new_pixels_count, new_width)]
    ascii_image = "\n".join(ascii_image)

    logging.info(ascii_image)

    return func.HttpResponse(
        ascii_image,
        status_code=200
    )
Test out our endpoint
Since our function only accepts POST requests, and we're programmers, we should write our own code to test it out. Since this project is using Python, we'll write the code to test our endpoint in Python.
To recap, we have an endpoint that accepts POST requests and requires a JSON with an image variable in the request body. This variable must be base64 data of an image. Once we send out correctly formatted request, we get back ASCII art representation of the image sent. For the purpose of testing, let's say that we then want to save this ASCII art to a txt file, so we can keep it for bragging purposes :D.
# If you're missing any of the dependencies listed, install them using: pip install {name}
import requests
import json

url = "http://localhost:7071/api/HttpTrigger"

payload = json.dumps({
  "image_obj": "{place_image_base64}"
})
headers = {
  'Content-Type': 'application/json'
}

response = requests.request("POST", url, headers=headers, data=payload)

with open("ASCII_art.txt", "w") as text_file:
    text_file.write(response.text)
And that's it! You should have simple working API. You can now do whatever you want with it :D. This project was heavily inspired by the following article, where the author describes more in detail, how the pixel-to-ASCII conversion actually works and I heavily recommend reading it as well.
Third project - Timer Trigger
Timer Trigger is a piece of code that runs at a given time based on CRON settings. Use case examples could include, sending an email every day at 8:00 (which is what we're going to build) This is basically a serverless crontab
Prerequisites:
- Ready to use development environment
Setup
To create the project we need to run the command func init, select node, and then select javascript. Once we have a project created, we need
to add a timer trigger to it. So run the func new. If it takes a while, don't worry. This is normal for
new projects Once your menu loads select Timer Trigger (at the bottom). Next, you need to run the
following command:
func settings add AzureWebJobsStorage UseDevelopmentStorage=true
We need to do this because Timer Trigger requires an Azure Storage account / connection. If you ever wanted to publish this, you'll need to run
the command above again, but this time instead of UseDevelopmentStorage=true, pass it your Azure Storage
connection string as an argument.
At this point, we need to do one more thing, which is to turn on the Azure Storage emulator. To do this, go into the C:\Program Files (x86)\Microsoft SDKs\Azure\Storage Emulator directory. Open your terminal here and enter the
following 2 commands. First command will create an Azure Storage instance locally and the second one will turn on the created instance on. The
first command is: ./AzureStorageEmulator.exe init. The second command is: ./AzureStorageEmulator.exe start.
If everything worked, you should have the following project structure:
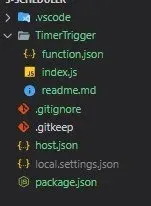
Check out the folder with your trigger's name. It has a file named readme.md which I suggest you read,
but for now, we'll only focus on following two files.
First one is function.json
{
  "bindings": [
    {
      "name": "myTimer",
      "type": "timerTrigger",
      "direction": "in",
      "schedule": "0 */5 * * * *"
    }
  ]
}
Second one is index.js
module.exports = async function (context, myTimer) {
    var timeStamp = new Date().toISOString();

    if (myTimer.IsPastDue)
    {
        context.log('JavaScript is running late!');
    }
    context.log('JavaScript timer trigger function ran!', timeStamp);
};
Creating the main functionality
For development purposes, let's just make this function run every 5 seconds for now. We can achieve this by editing function.json
{
  "bindings": [
    {
      "name": "myTimer",
      "type": "timerTrigger",
      "direction": "in",
      "schedule": "*/5 * * * * *"
    }
  ]
}
Let's test if everything works by making the function run every 5 seconds and logging some output to the console. We can achieve this by editing
index.js
module.exports = async function (context, myTimer) {
  console.log("Function ran correctly.");
};
Start the app using the func start command and you should see the text Function ran correctly. appear in console every 5 seconds
Everything works? Great, that was the initial setup to test everything working, and now we can get to sending emails. Since we want to simplify the process as much as we can, we'll install the Nodemailer library to send emails for us using generated temp accounts. We do this with the following command:
npm install nodemailerThe next thing we need to do is: connect to the SMTP server with our data. In our case, we will use the SMTP server provided by Nodemailer with the possibility of generating a new temporary account:
const nodemailer = require("nodemailer");

module.exports = async function (context, myTimer) {
  let testAcc = await nodemailer.createTestAccount();

  let transporter = nodemailer.createTransport({
    host: "smtp.ethereal.email",
    port: 587,
    secure: false, // true for 465, false for every other port
    auth: {
      user: testAcc.user, // generated ethereal username
      pass: testAcc.pass, // generated ethereal password
    },
  });
};
Lastly, we want to send the email itself. This can be done using following:
const nodemailer = require("nodemailer");

module.exports = async function (context, myTimer) {
  let testAcc = await nodemailer.createTestAccount();

  let transporter = nodemailer.createTransport({
    host: "smtp.ethereal.email",
    port: 587,
    secure: false, // true for 465, false for every other port
    auth: {
      user: testAcc.user, // generated ethereal username
      pass: testAcc.pass, // generated ethereal password
    },
  });

  let messageInfo = await transporter.sendMail({
    from: '"Examle" < foo@example.com >',
    to: "bar@example.com, baz@example.com",
    subject: "Example email",
    text: "Hello world?",
  });

  console.log("Preview URL: %s", nodemailer.getTestMessageUrl(messageInfo));
};
How to CRON
Simply put, the timer schedule for timer trigger execution is set using standardized cron expressions. The pattern is {seconds} {minutes} {hours} {days} {months} {days of the week} with each part being represented by an asterisk
(*) which means "Every". The "/" symbol followed by a number represents the frequency of the action, for example, every 5 seconds would be
*/5 * * * * , but every fifth second in a minute would look like this: 5 * * * * *.
So, to send emails every day at 8am, the expression would be * * 8 * * *, all that remains is to enter
it into the function.json file and publish it to Azure.
{
  "bindings": [
    {
      "name": "myTimer",
      "type": "timerTrigger",
      "direction": "in",
      "schedule": "* * 8 * * *"
    }
  ]
}
I hope you enjoyed this article/blog post!
If you have any questions, problems or want to start a discussion, don't hesitate and write me an email!